1. Understanding Shelter Priorities in American Wilderness
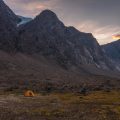
When you find yourself spending an unexpected night in the wild, building a shelter becomes your top priority. The American wilderness is vast and diverse, from the chilly forests of the Pacific Northwest to the dry deserts of the Southwest and everything in between. Knowing what you need to survive overnight can make all the difference.
Core Needs for Overnight Survival
Your main goals are to stay warm, dry, and safe. Heres a quick breakdown of what you should focus on:
| Need | Why It Matters | Considerations by Region |
|---|---|---|
| Protection from Weather | Staying dry and avoiding wind exposure helps prevent hypothermia or heat exhaustion. | Northwest: Rain and cold winds Southwest: Intense sun and chilly nights Northeast: Snow, rain, and wind Southeast: Heavy rain, humidity |
| Insulation from Ground | The ground can sap your body heat quickly, especially at night. | Forests/Mountains: Use leaves or pine needles Deserts: Use brush or clothing layers Prairies: Grass or small branches |
| Shelter Location Safety | Avoiding hazards like falling branches, flooding, or animal paths keeps you safer through the night. | Avoid low spots in rain-prone areas Avoid under dead trees (“widowmakers”) Avoid game trails and insect nests |
| Visibility for Rescue | If youre waiting for help, being visible increases your chances of being found sooner. | Open clearings are good during day Add bright clothing/materials to shelters if possible |
Shelter Priority Tips for Emergency Situations
- Simplicity First: Use what’s around you—branches, leaves, rocks, even your backpack—to build a basic shelter quickly.
- Time Management: Start before dark. Building in daylight saves time and energy.
- No Fire? No Problem: Focus on insulation and wind protection if fire isn’t an option due to weather or fire bans.
- Shelter Size: Make it just big enough to fit you snugly; smaller shelters retain heat better.
- Local Wildlife: Be aware of local animals (bears in the Rockies, snakes in the Southwest) when choosing your spot.
The Big Picture: Comfort and Safety Go Hand-in-Hand
Your shelter doesn’t have to be fancy—it just needs to keep you protected from the elements and as comfortable as possible until help arrives or morning comes. Always assess your surroundings, use available materials wisely, and remember that staying calm is just as important as staying warm. In any American wilderness emergency overnight scenario, these priorities can give you the best shot at making it through safely.
2. Site Selection and Environmental Awareness
When you’re caught in the wild and need to spend the night, choosing the right spot for your emergency shelter can make all the difference. In the U.S., landscapes range from forests and deserts to mountains and prairies, so understanding your environment is key. Let’s break down what you should look for and avoid.
Key Factors for Choosing a Shelter Site
| Factor | What to Look For | What to Avoid |
|---|---|---|
| Elevation | Slightly elevated ground to stay dry in case of rain or melting snow. | Low spots like valleys or dry creek beds that could flood quickly. |
| Wind Protection | A site with natural barriers like bushes, trees, or rocks on the windward side. | Exposed ridges or hilltops where winds are strongest. |
| Overhead Hazards | Clear area without dead branches (“widowmakers”) above you. | Under old, leaning trees or cliffs with loose rocks. |
| Ground Surface | Flat, soft surface (like grass or pine needles) for comfort and insulation. | Bumpy, rocky, or wet ground that can sap your body heat. |
| Proximity to Resources | Near water (but not too close), firewood, and natural materials for building shelters. | Directly next to rivers, lakes, or animal trails where wildlife may pass through. |
Regional Hazards to Consider
Wildlife Encounters
If you’re in bear country (think: Rockies, Pacific Northwest, Alaska), set up camp at least 200 feet from food storage and cooking areas. Avoid game trails or berry patches—these attract animals. In the Southwest, watch out for snakes; check under logs and rocks before settling down.
Flooding Risks
Avoid camping in dried riverbeds (called “arroyos” in the Southwest) or low-lying areas that might flash flood during storms. Even if it looks dry, a sudden rain miles away can send water rushing through these spots overnight.
Weather Conditions
Shelter from wind and rain is crucial. In open plains (Midwest), look for small groves of trees; in forests, tuck behind dense shrubs. In snowy regions (Sierra Nevada, Rockies), avoid open slopes where avalanches could occur after fresh snowfall. Always check above and around you for potential hazards—especially after storms.
Quick Reference Table: Do’s & Don’ts by Region
| Region | Do This | Avoid This |
|---|---|---|
| Pine Forests (Pacific Northwest) | Shelter under healthy evergreens for rain cover. | Avoid setting up beneath dead limbs or on mossy wet ground. |
| Desert (Southwest) | Shelter behind boulders for shade/windbreaks; check for critters first. | Avoid washes/arroyos due to flash flood risk. |
| Mountains (Rockies) | Shelter on flat ledges away from cliff edges. | Avoid avalanche paths and exposed ridgelines during storms. |
| Prairies/Midwest Fields | Shelter near tree lines for wind protection. | Avoid open fields during thunderstorms due to lightning risk. |
| Southeast Woods/Swamps | Shelter on higher ground away from standing water to avoid bugs/flooding. | Avoid thick brush where snakes may hide. |
Choosing the right shelter site is about staying alert and thinking ahead. By paying attention to your surroundings and knowing what hazards are common in your region, you boost your chances of having a safe night in the wild.
![]()
3. Essential Materials and Improvising with Nature
Gathering Local Resources
When you find yourself needing to spend the night outdoors unexpectedly, knowing how to gather materials from your surroundings can make all the difference. The best shelter materials are often right under your nose—deadwood for structure, leaves for insulation, and even snow as an emergency resource.
Common Shelter Materials in the Wild
| Material | Where to Find It | Main Use |
|---|---|---|
| Deadwood (branches, sticks) | Forest floor, near fallen trees | Building frame or support beams |
| Pine Needles & Leaves | Under pine trees, leafy areas | Insulation and waterproofing layer |
| Bark & Large Leaves | Trees like birch, big-leaf plants | Roof cover, extra water protection |
| Snow | Open fields or shaded snowbanks | Packing for windbreaks or snow caves |
| Moss & Grass | Shaded rocks, near streams or meadows | Cushioning and added insulation |
Making the Most of Your Pack and Gear
If you have a backpack or gear with you, use it smartly. Even if you don’t have a tent, tarps, ponchos, or even emergency blankets can be lifesavers when paired with natural resources. Heres how you can improvise:
- Tarp or Emergency Blanket: Use as a rainfly by draping over a frame made of sticks.
- Cordage (paracord or shoelaces): Lash branches together for stability.
- Trekking Poles: Use as upright supports for lean-tos or tarp shelters.
- Pocket Knife: Cut branches, strip bark, or notch wood for better stability.
- Clothing Layers: Stuff with dry leaves or grass for extra warmth overnight.
Shelter Building Tips for Different Terrains
| Terrain Type | Shelter Suggestion | Material Tips |
|---|---|---|
| Wooded Forests | Lean-to or debris hut using deadwood and leaves. | Avoid green branches—they’re harder to break and don’t insulate well. |
| Open Plains/Grasslands | A-frame with tall grass and any available sticks. | Bundle grasses tightly for better insulation. |
| Snowy Areas/Mountains | Snow cave or trench shelter built into a drift. | Pile snow thick enough to block wind but allow ventilation. |
| Desert/Arid Zones | Tarp shade shelter anchored with rocks or sandbags. | Create airflow underneath to avoid overheating during the day. |
Packing Smart: Items That Double as Shelter Tools
- Poncho: Doubles as rain protection and emergency roof material.
- Duct Tape: Repairs tears in tarps or secures materials quickly.
- Trekking Poles: Quickly become support beams in soft ground.
The key is to assess what’s available—both in your pack and around you—and get creative. With some know-how and resourcefulness, you can build a sturdy overnight shelter almost anywhere in the American wilderness.
4. Step-by-Step Shelter Building Techniques
Building a Lean-To Shelter
The lean-to is a classic American emergency shelter, often seen in survival stories from the Appalachian Trail to the Sierra Nevada. Its simple design makes it a go-to for hikers and campers caught out overnight.
Materials Needed:
- Sturdy branch or pole (about 6-8 feet long)
- Several shorter branches for support
- Pine boughs, leaves, or debris for insulation
- Paracord or natural vines (if available)
Steps:
- Find two trees about 6 feet apart.
- Lash your main branch horizontally between them at waist height.
- Lean shorter branches against the main branch at an angle, forming a wall.
- Cover the angled branches with layers of debris, leaves, or pine boughs for insulation and rain protection.
- Make sure to leave one side open, facing away from the wind.
Cultural Reference:
This shelter mirrors those used by pioneers and scouts throughout American history, especially during long treks across wild terrain.
Constructing a Debris Hut
A debris hut is another iconic shelter, ideal for cold nights in wooded American landscapes like those in the Pacific Northwest or New England forests.
Materials Needed:
- Long sturdy stick (spine of the hut)
- Many smaller sticks for ribs
- Large amounts of leaves, grass, ferns, or pine needles
Steps:
- Lay down the main stick at an angle using a stump or rock as support for one end.
- Create a ribcage structure by leaning smaller sticks on both sides of the spine.
- Pile debris over the frame until it’s about two feet thick for insulation.
- Crawl inside to check for drafts; add more debris if needed.
| Shelter Type | Main Material | Best For |
|---|---|---|
| Lean-To | Branches & Debris | Mild weather, quick build |
| Debris Hut | Sticks & Leaves | Cold weather, insulation |
Cultural Reference:
This style of shelter is similar to what Native Americans and early trappers built while exploring North America’s vast wilderness.
Tarping: The All-American Fast Shelter Fix
If you have a tarp—like most modern U.S. backpackers do—you’re already halfway to safety. Tarps are lightweight and versatile, making them a favorite among outdoor enthusiasts from Yellowstone to the Grand Canyon.
Basic Tarp Shelter Setup:
- Select two trees about 8-10 feet apart.
- Tie a ridgeline between them using paracord or rope.
- Drape the tarp over the line so it forms an A-frame shape.
- Stake down the corners with rocks or sticks to keep it secure against wind and rain.
Cultural Reference:
The tarp setup is inspired by cowboy camps and Boy Scout outings—both essential parts of American outdoor tradition.
5. Staying Warm, Dry, and Safe Overnight
Critical Tips for Insulation
When you’re spending the night in the wild, staying warm is a top priority. Good insulation keeps your body heat from escaping. Here are a few classic American backcountry tricks:
| Insulation Material | How to Use | Pros & Cons |
|---|---|---|
| Pine Needles/Leaves | Stuff between layers of clothing or line the ground beneath you | Free and effective; can be pokey or damp if not chosen wisely |
| Emergency Blanket (Mylar) | Wrap around yourself or use as a shelter lining | Lightweight, packs small; doesn’t breathe well, can trap moisture |
| Bark/Branches | Layer beneath sleeping area to create an air gap | Good insulator; can be hard to gather in some areas |
| Extra Clothing | Wear in layers and keep dry at all costs | Best warmth comes when dry; avoid cotton which holds moisture |
Weatherproofing Your Shelter American-Style
No matter what type of shelter you build—whether it’s a lean-to, debris hut, or makeshift tarp tent—keeping out rain and wind is key. Here’s how outdoor experts do it:
- Angle your roof steeply: This helps rain and snow slide off instead of pooling.
- Line with natural debris: Stack leaves, pine boughs, or grass thickly on top for extra waterproofing.
- Tarp tricks: If you have a tarp, pitch it taut and low to the ground. Dig a small trench around your shelter to channel water away—an old Boy Scout favorite!
- Avoid low spots: Always build on slightly higher ground to prevent flooding during storms.
Maintaining Morale Through the Night
Mental strength is just as important as physical safety. Here are some proven American wilderness tips for keeping spirits up until morning:
| Tip | Description | Cultural Connection |
|---|---|---|
| Singing or Whistling Tunes | Lifts spirits and keeps wildlife at bay. | Cowboys and hikers alike sing by the campfire for comfort. |
| Brew Hot Drinks if Possible | If you have a camp stove or safe fire setup, make cocoa or tea. | Classic American camping tradition—warms body and soul. |
| Mental Check-Ins | Talk to yourself, review your plan, stay positive. | SAR teams encourage “stop, think, observe, plan”—a survival mantra. |
Emergency Procedures: Safety First!
- Keeps Signals Ready: Place bright clothing or gear where rescuers might see them at first light.
- Avoid Open Flames Inside Shelters: Only use fires outside your main sleeping area to reduce risk of burns or carbon monoxide poisoning.
- Knot Know-How: Brush up on simple knots like the taut-line hitch—a favorite among American campers—for securing tarps or tying down shelters against wind.
The Bottom Line: Stay Dry, Stay Warm, Stay Calm!
If you focus on insulation, weatherproofing, and keeping your morale high using these practical techniques from American outdoor culture, you’ll greatly increase your chances of surviving the night in good shape. Just remember: preparation and calm thinking make all the difference when adventure turns into survival.