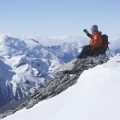
Introduction: Chasing Epic Shots in the Rockies
If you’re itching to fill your camera roll with jaw-dropping landscapes, there’s nowhere quite like the Rocky Mountains. The Rockies stretch from New Mexico all the way up to Canada, dishing out untamed peaks, mirror-clear lakes, and wild backcountry that’s pure gold for outdoor photographers. Out here, every hike is an opportunity to capture something epic—whether it’s sunrise over a glacial valley or golden hour lighting up alpine meadows. But don’t be fooled: nailing those iconic shots takes more than just showing up with a fancy camera. You’ve got to prep both your gear and your mindset. That means packing light but smart, knowing how to protect your equipment from the elements, and planning your route so you hit those killer viewpoints when the light is just right. It’s about balancing the demands of hiking—think unpredictable weather, steep climbs, and changing conditions—with the patience and eye for detail that great landscape photography requires. Ready to step up your adventure game? Grab your pack, dial in those camera settings, and let’s get into what makes the Rockies a photographer’s dream—and how you can bring home shots that’ll make everyone back home jealous.
2. Must-Hike Trails for Iconic Photo Ops
If you’re a hiker who lives for the perfect shot, the Rockies are your playground. From Montana’s Glacier National Park to Colorado’s Rocky Mountain National Park, these trails deliver jaw-dropping vistas and legendary lighting conditions that will make your camera work overtime. Here’s a hard-hitting breakdown of the top must-hike trails, with practical notes for both the trek and the shot.
Glacier National Park: The Northern Exposure
| Trail | Photo Highlights | Lighting Tips | Hiking Notes |
|---|---|---|---|
| Highline Trail | Expansive valley views, wildflower meadows, dramatic cliffs | Early morning for soft backlight, late afternoon for golden hues on peaks | Moderate; watch out for exposed ledges—pack a wide lens and ND filters |
| Grinnell Glacier Trail | Turquoise glacier lake, rugged snowfields, wildlife shots (mountain goats!) | Noon to early afternoon for glacier shimmer, but sunrise for solitude | Challenging; bring extra batteries—cold temps drain power fast |
Grand Teton National Park: Reflections & Rugged Peaks
| Trail | Photo Highlights | Lighting Tips | Hiking Notes |
|---|---|---|---|
| Jenny Lake Loop | Teton reflections in glassy water, dense pine frames, moody mist mornings | Dawn is king here—sunrise lights up the range and minimizes crowds | Easy to moderate; pack a polarizer to cut glare off the lake surface |
| Inspiration Point via Cascade Canyon | Sweeping canyon shots, waterfall action, panoramic peaks from above Jenny Lake | Lunch hour sun can be harsh—shoot bracketed exposures or use HDR techniques | Steep ascent; travel light but stable tripod is a must for long exposures at the top |
Rocky Mountain National Park: Colorado’s High-Altitude Classics
| Trail | Photo Highlights | Lighting Tips | Hiking Notes |
|---|---|---|---|
| Bierstadt Lake Trailhead to Bear Lake Corridor | Pine-framed lakes, mirrored summits, chance at alpenglow if you hit dawn/dusk right | Dusk creates killer colors on Longs Peak; morning for mist and solitude | Moderate altitude gain; bring extra memory cards—you’ll fill them fast here |
| Sky Pond via Glacier Gorge Trailhead | Dramatic waterfalls (Alberta Falls), jagged cirques, wildflowers in summer | Shoot midday waterfalls with ND filter for smooth effect; sunrise/sunset for peak drama | A strenuous hike—waterproof your gear and plan for rapid weather changes |
Tactical Takeaways for Photographers on Trail
- Pace yourself—iconic shots often require patience and scouting different angles.
- The best light comes at the price of early alarms or late returns. Headlamps are not optional.
- Shoot RAW. Post-processing can save blown highlights and shadow detail after tough hikes.
Your Next Step
The Rockies reward those willing to work for their frames. Hit these trails with your kit dialed in, boots broken-in, and eyes open. Next up: how to plan your route and gear loadout like a pro mountain photographer.
3. Packing and Gear Essentials for Shooter-Hikers
A No-Nonsense Kit List for Rocky Mountain Photography
If you want to capture the Rockies at their finest, you need to pack like you mean business. Conditions can change in a heartbeat, and there’s no room for rookie mistakes miles from the trailhead. Here’s what every shooter-hiker needs in their pack before heading out.
Cameras and Lenses: Go Light, Stay Versatile
Mirrorless cameras are your best friend here—lightweight, rugged, and easy on battery life. Pair a weather-sealed body with two lenses: a wide-angle (16-35mm) for those sweeping vistas, and a telephoto (70-200mm) for wildlife or distant peaks. Don’t forget extra batteries (the cold drains them fast), memory cards, and a microfiber cloth for unexpected snow or rain spatter.
Weatherproofing: Because the Rockies Don’t Care About Your Gear
Storms roll in quick. Pack a high-quality rain cover for your camera and lenses—think Peak Design or Think Tank. Dry bags or heavy-duty ziplocks keep your electronics dry inside your pack. Always carry a lens hood; it shields glass from both glare and surprise hail. For yourself, layer up with moisture-wicking base layers, an insulating mid-layer, and a bombproof waterproof shell.
Survival Basics: Safety First, Shots Second
Navigation is non-negotiable—bring a physical map and compass even if you have GPS. A personal locator beacon (PLB) could save your life if things go sideways. Toss in water purification tabs, high-calorie snacks, a headlamp with spare batteries, first aid kit, multitool, gloves, hat, and an emergency blanket. The Rockies reward the prepared and punish the careless.
Pro Tip: Keep It Accessible
Pack smart—your camera should be ready to grab at all times. Use a chest harness or side holster so you don’t miss that golden moment while fumbling with zippers. Survival gear goes near the top of your pack; seconds matter when weather turns ugly.
4. Lighting and Timing: Nail the Golden Hour
Mastering Rocky Mountain photography is about more than just being in the right place—timing is everything. The Rockies serve up their best drama during golden hour (the first and last hour of sunlight) and blue hour (the short window before sunrise or after sunset). These moments bring out deep contrasts, warm tones, and that ethereal mountain glow that turns casual shots into frame-worthy masterpieces. Planning your hike to sync with these windows isn’t just a suggestion—it’s a tactical necessity for serious shooters.
Why Golden Hour Is Your Secret Weapon
Sunrise and sunset light cuts through the Rockies’ rugged terrain, throwing long shadows and lighting up peaks in fiery hues. During golden hour, you’ll avoid harsh midday glare and nail those Instagram-friendly colors every time. Blue hour, meanwhile, gives you moody, cinematic tones—think mist on the lake, silhouettes of pine trees, and dramatic sky gradients.
Tactical Timing Table: When to Hit the Trail
| Season | Sunrise (Approx.) | Sunset (Approx.) | Best Time to Start Hike |
|---|---|---|---|
| Spring | 6:00 AM | 8:00 PM | 4:30 AM / 5:30 PM |
| Summer | 5:30 AM | 8:30 PM | 4:00 AM / 7:00 PM |
| Fall | 6:30 AM | 7:00 PM | 5:00 AM / 5:30 PM |
| Winter | 7:30 AM | 5:00 PM | 6:00 AM / 3:30 PM |
Tactical Tips for Chasing the Light:
- Sunscreen & Headlamp: Early starts mean you’ll be hiking in the dark—bring a reliable headlamp, plus sunscreen for when that sun finally crests.
- Scout Your Route: Pre-hike your trail virtually with Google Earth or AllTrails so you know where sunrise/sunset lines up with killer viewpoints.
- Pace Yourself: Give yourself buffer time—Rockies trails can get technical, especially in low light.
- Dress in Layers: Temps swing wildly at dawn/dusk. Bring insulation even in summer.
- Batteries & Memory Cards: Cold drains battery life fast; pack spares and keep them warm in your pockets.
- No Cell Signal? No Problem: Download offline maps and let someone know your plan before you go off-grid chasing those epic shots.
Nailing golden hour means more than great photos—it’s about owning the moment. Plan tactically, hike smart, and let the Rockies give you a show most people only see on postcards.
5. Staying Safe and Leave No Trace
If you’re chasing epic shots in the Rockies, you need more than a sharp eye—you need sharp instincts. These mountains are beautiful, but they don’t care about your Instagram. Here’s the hard truth: weather turns on a dime, trails vanish under snow, and altitude can knock you flat before you get that perfect sunrise.
Respect the Mountain Hazards
Weather
Out here, bluebird skies can turn to hailstorms in minutes. Always check updated forecasts before heading out—and carry waterproof protection for both yourself and your gear. No shot is worth hypothermia or fried electronics.
Altitude
The air gets thin fast. Even seasoned hikers can fall prey to altitude sickness. Acclimate gradually, hydrate constantly, and know your limits—don’t push for that summit shot if you’re dizzy or nauseous.
Wildlife
Bears, moose, mountain lions—they all call these peaks home. Carry bear spray and know how to use it (hint: practice the safety before you’re face-to-face). Keep your food sealed tight and never bait animals for a photo. Wild means wild.
The Photographer’s Code of Respect
Leave No Trace
Your epic photo shouldn’t leave scars on the landscape. Stay on marked trails—even if that angle looks better off-track. Don’t trample delicate alpine meadows or disturb wildlife just for a shot. Pack out everything (including snack wrappers and used filters), and don’t stack rocks or carve initials—it’s not your studio.
Share the Space
If another hiker is enjoying the view, respect their moment too—wait your turn or share tips instead of crowding them out. The Rockies aren’t just yours; they belong to everyone who finds meaning here.
Bottom Line:
Shoot smart, tread lightly, and remember: the best photographers capture moments without leaving a trace. That’s how you keep the Rockies wild—and worthy—for generations of lens-hunters after you.
6. Hidden Gems: Off-the-Beaten-Path Spots Locals Love
If you’re gunning for truly frame-worthy shots in the Rockies, sometimes you need to step away from the well-worn trails and iconic overlooks. Local hikers and photographers know there’s a treasure trove of secret spots—places where the scenery hits different and your camera can catch something nobody else has. But these hidden gems demand respect, both for the land and the experience.
Insider Tips for Finding Unique Compositions
Start by chatting up local rangers, gear shop owners, or even fellow hikers at trailheads. Most won’t spill everything, but if you show respect for Leave No Trace principles, they’ll point you toward lesser-known ridgelines, alpine meadows, or creekside clearings that rarely see crowds. Keep an eye on topo maps and satellite imagery—sometimes the best angles are just off main routes.
Local Favorites That Stay Low-Key
While the exact locations are closely guarded, here’s a taste of what you might find: wildflower basins with mirror-like tarns near Crested Butte, craggy passes above Estes Park where sunrise lights up entire valleys, or aspen groves outside Telluride glowing gold in late September. Each offers a chance to capture the Rockies’ spirit without another tripod in your shot.
Respecting the Land and Community
Shooting these off-the-beaten-path locales comes with responsibility. Stick to existing trails where possible, pack out every scrap of gear (and trash), and never geo-tag sensitive locations online. The goal is to savor solitude, get your shot, and leave it wild for the next intrepid photographer who puts in the work.
For those willing to do their homework and hike a little harder, the Rockies still have secrets to share—just remember that preserving their mystery is part of what keeps these hidden gems magical.