Choosing the Right Campsite Location
When it comes to designing your campsite for efficiency, where you set up camp is just as important as how you organize your gear. Selecting a safe, comfortable spot that respects both the environment and your own well-being sets the tone for your entire backcountry experience. Here are some practical tips, rooted in Leave No Trace principles, to help you find the perfect location:
Prioritize Safety First
Look for level ground at least 200 feet away from water sources like lakes and streams—not only to prevent erosion and protect wildlife habitats, but also to avoid unexpected flooding. Avoid setting up under dead trees or large branches that could fall during wind or storms. Keep an eye out for signs of animal activity, such as tracks or droppings, and steer clear of these areas to minimize wildlife encounters.
Maximize Comfort
Aim for natural windbreaks—like stands of trees or gentle hills—to shield your tent from gusty winds. Pick spots with soft ground (think pine needles or grass) for easier sleeping, but avoid fragile meadows or areas with delicate vegetation. If possible, position your tent so the morning sun warms you up, especially on chilly nights.
Embrace Leave No Trace
Stick to established campsites whenever possible—these are usually marked by hardened ground or obvious use. Avoid expanding existing sites or creating new ones, as this can damage sensitive ecosystems. Always pack out what you pack in and scatter any natural materials you move (like rocks or sticks) before leaving.
Enhancing Your Camp Experience
Choosing wisely isn’t just about following rules—it’s about setting yourself up for a restful, memorable adventure. A thoughtfully chosen site lets you focus on relaxation and connection with nature while minimizing your impact on the wild places you love.
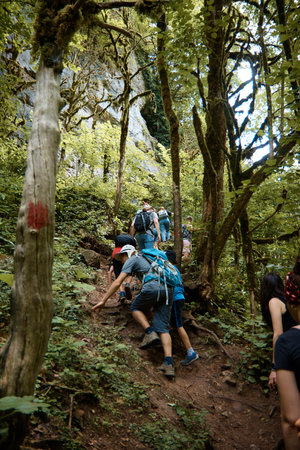
2. Setting Up Your Tent and Sleep Area
When you’re deep in the backcountry, your tent and sleep area become your sanctuary. Smart planning ensures protection from the elements, personal privacy, and a truly restful night’s sleep—crucial for feeling your best on the trail. Here’s how to set up your sleep zone efficiently while minimizing your impact on nature.
Choosing the Right Location
Pick a flat, dry spot at least 200 feet away from water sources to follow Leave No Trace principles. Avoid low-lying areas where rainwater might collect or windy ridges that can make sleeping uncomfortable. Use natural features like trees or rocks as windbreaks and visual barriers for added privacy.
Arranging for Comfort and Protection
| Best Practice | Why It Matters |
|---|---|
| Head uphill, feet downhill | Prevents blood rushing to your head and keeps water runoff away from your face |
| Tent door facing away from prevailing wind | Reduces cold drafts and keeps rain out of your tent |
| Use ground cloth or footprint | Adds a layer between your tent and damp ground, extending tent life and comfort |
Maximizing Privacy in Shared Sites
If you’re camping with friends or near other hikers, position tents with doors facing away from each other or use natural barriers for separation. Consider setting up a small tarp or hanging a lightweight scarf for extra seclusion if needed—especially helpful for women who want a little more personal space.
Organizing Your Sleeping Area Inside the Tent
- Keep essentials like headlamp, water bottle, and bear spray within arm’s reach.
- Store extra clothes in a stuff sack to use as a pillow or provide insulation at your feet.
- Designate specific spots for shoes and gear so you won’t be fumbling in the dark.
A Restful Night Starts With Smart Setup
A thoughtfully arranged sleep area helps you recharge after long days outdoors. Prioritize comfort, safety, and respect for those around you—and you’ll wake up ready for whatever adventure comes next.
![]()
3. Designing an Efficient Cooking Zone
Creating a safe and organized kitchen area is essential for both your well-being and the environment when camping in the backcountry. Start by choosing a flat, open spot at least 200 feet away from your sleeping area and any water sources—this helps prevent wildlife encounters and protects local ecosystems. Use a tarp or ground cloth to define your cooking zone and keep your gear clean.
Safe Food Prep: Keeping Contamination Low
To avoid cross-contamination, set up distinct areas for prepping, cooking, and cleaning. Pack color-coded cutting boards or designate specific surfaces for raw meats versus veggies. Always wash your hands before handling food; bring biodegradable soap and a collapsible sink if possible. Store perishables in bear-proof containers or odor-resistant bags, and never leave food unattended.
Organized Cooking Gear
Keep utensils, cookware, and ingredients within easy reach by using hanging organizers or packing cubes. Arrange items so that you can quickly find what you need without rummaging through bags—this not only saves time but reduces clutter that could attract animals.
Keeping Wildlife Away
Always cook and eat away from your tent to avoid lingering smells. After meals, promptly clean all dishes and dispose of waste following Leave No Trace principles. Hang food in a bear bag or use a bear canister overnight, far from your sleeping area. By maintaining a tidy, intentional kitchen space, you’ll minimize risks, streamline meal prep, and enjoy greater peace of mind in the wild.
4. Organizing Gear and Personal Items
Efficient campsite organization goes beyond just setting up your tent and kitchen. Thoughtfully arranging your gear and personal items helps you save time, reduce stress, and keep your site clutter-free—especially important when youre sharing space or managing limited daylight hours.
Clever Strategies for Campsite Organization
Before you even leave home, consider grouping similar items together in color-coded stuff sacks or labeled dry bags. This makes it simple to spot what you need at a glance. Once at camp, establish designated zones for cooking, sleeping, hygiene, and communal items. This not only streamlines your workflow but also keeps essential gear easily accessible for everyone.
Intentional Placement of Essentials
To ensure nothing gets misplaced—and you’re never scrambling for a flashlight or first-aid kit—assign each item a “home” in camp. Here’s a quick-reference table to help you plan out intentional placement:
| Gear Category | Recommended Placement | Pro Tip |
|---|---|---|
| Cooking Supplies | Near the kitchen zone, away from tents | Store in a bear canister or hang if in bear country |
| Personal Items (toothbrush, headlamp) | Inside tent vestibule or a small bag hung inside tent | Use a mesh pouch for visibility and ventilation |
| First-Aid Kit | Easily accessible communal area or clipped near tent door | Mark with reflective tape for night access |
| Shoes/Boots | Outside tent entrance on a groundsheet | Flip them upside down to keep critters out overnight |
| Water Bottles/Filtration | Central location near meal prep zone | Keep an extra bottle filled for emergencies |
| Rain Gear/Layers | At arm’s reach inside tent or under vestibule flap | Packing cubes make swapping layers easy and fast |
Reducing Clutter While Maximizing Comfort
Avoid the classic “yard sale” look by returning each item to its assigned place after use. Encourage everyone to keep personal gear tidy—this is especially helpful if you’re camping with kids or friends new to the outdoors. At night, double-check that everything is stowed safely to prevent lost gear or wildlife encounters.
The Female-Friendly Touch: Personal Care Essentials Made Easy
If you’re looking for a women-friendly tip, pack a small organizer specifically for hygiene products like wipes, menstrual supplies, and hand sanitizer. Keep this pouch in an accessible yet discreet spot in your tent. This ensures privacy and comfort while reducing the stress of searching for essentials when nature calls.
5. Establishing a Hygienic Water and Waste System
Water Collection: Prioritize Safety and Efficiency
When setting up your backcountry campsite, one of the most crucial workflows to establish is a safe and efficient system for water collection. Always identify your water source before setting up camp—ideally, at least 200 feet away from your tent site and any waste areas. Use clean, designated containers for collecting water and avoid contaminating the source by keeping soap, food scraps, and hands out of the stream or lake. If you’re in bear country or remote locations, be sure to store water securely overnight. Filtering or boiling all collected water is a must for safety.
Dishwashing: Leave No Trace Principles
Washing dishes outdoors requires special care to protect both your health and the environment. Designate a specific area well away from natural water sources for dishwashing. Use biodegradable soap sparingly and always strain food particles before disposing of greywater. Scatter strained wastewater across a wide area at least 200 feet from any streams or lakes to minimize environmental impact. Carry a small mesh bag for air-drying dishes—a practical way to keep things organized while reducing mess around camp.
Responsible Waste Management: Pack It In, Pack It Out
Managing human and food waste responsibly is essential for minimizing your campsite’s footprint. For human waste, follow local regulations—use established toilets where available or dig a cathole 6-8 inches deep at least 200 feet from water sources, trails, and campsites. Carry out used toilet paper in a sealable plastic bag instead of burying it; this keeps nature pristine for everyone. All food scraps and trash should be packed out in secure containers or odor-proof bags to prevent attracting wildlife. Setting up a simple “waste station” with clearly marked bags helps everyone in your group stay organized and accountable.
Workflow Tip: Assign Roles
To keep things running smoothly, consider assigning specific roles within your group—one person collects water, another manages dishwashing, and someone else monitors waste disposal. This not only increases efficiency but also ensures nothing gets overlooked during your trip.
Staying Hygienic Boosts Comfort & Community
A clean and thoughtfully organized water and waste system makes backcountry living much more comfortable—for yourself, your group, and anyone who comes after you. It also shows respect for the land and helps preserve the wilderness experience for future adventurers.
6. Creating Communal and Relaxation Spaces
After you’ve organized your essential campsite workflow, it’s time to think about where everyone can unwind, connect, and recharge together. Designing communal and relaxation spaces is key to a welcoming backcountry experience, especially when camping with friends or family. With a little planning, you can create areas that encourage conversation, laughter, and those memorable moments that make every trip special.
Choose the Right Location
Start by picking a spot that’s centrally located but still feels inviting—think close enough to the cooking area for easy access to snacks, but far enough from tents to keep noise away from light sleepers. Look for natural features like flat rocks, logs, or shaded clearings to help define your space.
Seating Arrangements Matter
Comfortable seating is a must. Use camp chairs, lightweight stools, or even spread out a durable tarp or blanket for group lounging. Arrange seating in a circle or semi-circle to encourage conversation and ensure everyone feels included. If space allows, create smaller nooks off the main gathering spot for more intimate chats or solo relaxation.
Lighting Sets the Mood
As evening falls, battery-powered lanterns, string lights, or even headlamps hung from branches can transform your communal area into a cozy retreat. Soft lighting helps everyone feel safe and relaxed while keeping the atmosphere friendly and warm.
Define Boundaries Respectfully
To minimize impact on nature and maintain privacy for all campers, use natural materials or gear (like backpacks or extra coolers) to subtly mark the edges of communal areas. This helps everyone know where “group space” ends and personal zones begin.
Add Personal Touches
Encourage group members to bring something small—like a favorite camp mug, game, or throw blanket—to personalize the space. Consider setting up a small table for shared items like cards, books, or snacks. These thoughtful touches go a long way in making everyone feel at home outdoors.
Keep It Inclusive and Flexible
The best communal spaces are adaptable: move seats closer together for storytelling nights or spread out for yoga sessions in the morning. Be mindful of each person’s comfort level with crowds or noise—offer quieter corners for anyone needing downtime.
By intentionally designing gathering and chill-out areas within your campsite footprint, you’ll foster connection and comfort without sacrificing efficiency or respect for the environment. In the end, it’s these shared spaces that turn a good camping trip into an unforgettable adventure.