Planning Your Grand Adventure
The Grand Canyon Rim-to-Rim trek is often at the top of every hiker’s bucket list—and for good reason. Traversing from one rim to the other means experiencing some of America’s most dramatic scenery and taking on a challenge that’s as rewarding as it is demanding. Before you lace up your boots, though, there are some crucial planning steps to make sure your adventure is safe, legal, and unforgettable.
Essential Permits: Don’t Get Caught Without One
Permits are required for any overnight stay below the canyon rims, whether you’re camping or staying at Phantom Ranch. Day hikes that don’t include an overnight stop don’t require a permit, but most Rim-to-Rim hikers opt to split the journey over multiple days. Here’s what you need to know:
| Permit Type | Who Needs It? | How to Apply | When to Apply |
|---|---|---|---|
| Backcountry Permit | Overnight hikers/campers below rim | Submit application to Grand Canyon Backcountry Office (online/mail/fax) | Up to 4 months in advance; early applications recommended |
| Phantom Ranch Lottery | Those seeking cabin/lodge stay at Phantom Ranch | Lottery system via official website | 13 months prior; results announced monthly |
Best Time to Hike: Timing Is Everything
The Grand Canyon can be brutally hot or surprisingly cold depending on when you go. Most trekkers tackle Rim-to-Rim between mid-May and mid-October when North Rim facilities are open. Early spring and late fall bring cooler temperatures and fewer crowds but also higher risks of snow or trail closures on the North Rim. Summer hikes should start before dawn due to extreme heat in the inner canyon.
| Season | Weather Conditions | Crowds/Trail Access |
|---|---|---|
| Spring (May–June) | Mild temps; chance of late snow North Rim | North Rim opens mid-May; moderate crowds |
| Summer (July–August) | Extreme heat at lower elevations (100°F+) | Main season; busy trails; early starts essential |
| Fall (September–mid-October) | Pleasant temps; cooler nights; possible early snow North Rim | North Rim closes mid-October; less crowded late season |
| Winter (mid-October–May) | Cold/snowy North Rim; icy trails possible | North Rim closed to vehicles; South Rim open year-round for hardy adventurers only |
The Unique Challenges of Going Rim-to-Rim
It’s Not Just a Hike—It’s an Endurance Test!
Trekking from rim to rim means covering about 24 miles and over 10,000 feet of elevation change. Descending steeply into the canyon and then climbing back out is far tougher than it sounds. Here’s what makes this trek so unique:
- Elevation Changes: You’ll descend nearly a mile down and climb back up again—a serious workout for legs and lungs.
- No Shade & Intense Heat: The inner canyon can feel like a furnace midday. Plan water stops carefully.
- Sparse Water Sources: Water isn’t available year-round at every spot. Always check current conditions with the National Park Service before your hike.
- Lodging Logistics: Phantom Ranch fills up fast, and backcountry campsites are limited.
A Quick Reference Table: What Makes This Trek Special?
| Feature | Description/Challenge Level |
|---|---|
| Total Distance (South to North) | Around 24 miles / Moderate to Strenuous |
| Total Elevation Change | Approx. 10,000 ft gain/loss / Strenuous |
| Main Trails Used | Bright Angel or South Kaibab & North Kaibab / Well-maintained but steep |
| Main Hazards | Heat exhaustion, dehydration, altitude changes |
Your Adventure Starts with Smart Planning!
If you take care of permits, pick the right season, and prepare for the unique demands of this iconic trek, you’ll be well on your way to conquering America’s most famous hiking challenge!
2. Route Breakdown: North Rim vs. South Rim
The Grand Canyon Rim-to-Rim hike is a bucket-list adventure for outdoor enthusiasts, but before you lace up your boots, you’ll need to choose your starting point. Both the North Rim and South Rim offer unique experiences, trailheads, and scenic views. Here’s a detailed look at what each rim brings to the table so you can decide which route best fits your adventure style.
North Rim Overview
The North Rim is less visited than the South Rim, making it a quieter, more remote option for hikers who crave solitude. It sits at a higher elevation (about 8,000 feet), which means cooler temperatures and more lush forests. The season here is short—usually mid-May through mid-October—due to snow closures. The main trailhead on this side is the North Kaibab Trailhead.
North Kaibab Trail Highlights
- Trailhead Elevation: 8,241 ft
- Distance to Colorado River: 14 miles
- Notable Landmarks: Roaring Springs, Supai Tunnel, Ribbon Falls
- Scenery: Alpine meadows, dense pine forests, dramatic canyon vistas
- Amenities: Limited; North Rim Lodge and campground available during open season
South Rim Overview
The South Rim is the most popular entry point, accessible year-round with robust visitor facilities and classic viewpoints. It’s generally busier but offers easier logistics for transportation and accommodations. There are two main trailheads here: Bright Angel Trailhead and South Kaibab Trailhead.
South Kaibab Trail Highlights
- Trailhead Elevation: 7,260 ft
- Distance to Colorado River: 7 miles
- Notable Landmarks: Ooh Aah Point, Skeleton Point, Tipoff
- Scenery: Open ridgelines with sweeping canyon views from start to finish
- Amenities: No water along the trail (except at trailhead); shuttle required to access trailhead
Bright Angel Trail Highlights
- Trailhead Elevation: 6,860 ft
- Distance to Colorado River: 9.5 miles
- Notable Landmarks: Indian Garden, Plateau Point (side hike), Pipe Creek Beach
- Scenery: Shaded sections, water stops along the way, classic canyon walls
- Amenities: Water stations and resthouses at intervals; accessible from Grand Canyon Village
Quick Comparison Table
| North Kaibab Trail (North Rim) | South Kaibab Trail (South Rim) | Bright Angel Trail (South Rim) | |
|---|---|---|---|
| Main Features | Lush forest, fewer crowds, long descent/ascent | Sweeping views, exposed ridgeline, no water en route | Shaded sections, water stops, busy trail |
| Total Distance to River (one way) | 14 miles | 7 miles | 9.5 miles |
| Elevation Change (approx.) | -5,800 ft descent/ascent | -4,780 ft descent/ascent | -4,380 ft descent/ascent |
| Amenities & Logistics | Seasonal lodge/campground; limited services | No water; requires shuttle bus access | Water stations; easy access from village hotels/campgrounds |
| Crowds/Popularity | Low/Moderate | High (especially in spring/fall) | Very High (year-round) |
| Best For… | Solo hikers seeking quiet and challenge | Experienced hikers wanting big views fast | First-timers or those needing regular water/rest stops |
Your Choice Depends On…
- If you want solitude and cooler temps—try the North Rim via North Kaibab Trail.
- If you prefer a shorter but steeper path with epic views—go for the South Kaibab Trail.
- If you need more frequent water access or a less intense grade—Bright Angel is your friend.
Trek Tip:
No matter where you start or finish your Grand Canyon Rim-to-Rim journey, plan ahead! Shuttle services between rims are limited and require reservations. Check seasonal road closures and book accommodations well in advance during peak months.

3. Gearing Up: What to Pack and Wear
Backpacking Gear Essentials
The Grand Canyon Rim-to-Rim hike is no walk in the park. To stay safe and comfortable, you’ll want reliable gear. Here’s a quick checklist of must-haves:
| Item | Why You Need It |
|---|---|
| Sturdy Backpack (20-30L) | Big enough for essentials but not too heavy |
| Trekking Poles | Reduce strain on knees during steep descents/ascents |
| Headlamp & Extra Batteries | Canyon trails can be dark at dawn or dusk |
| First Aid Kit | For blisters, scrapes, and minor injuries |
| Map & Compass/GPS | Navigation backup in case your phone dies |
| Multi-tool/Knife | Handy for emergencies and food prep |
| Lightweight Emergency Blanket | Nights can get chilly, even in summer |
| Sunscreen & Lip Balm (SPF 30+) | The sun is intense at the Canyons rim and floor |
| Personal Identification & Permits | If camping overnight, backcountry permits are required! |
Clothing Tips: Dress for Success
Layering is Key:
- Base Layer: Moisture-wicking shirt (avoid cotton)
- Insulating Layer: Lightweight fleece or down jacket for chilly mornings/evenings
- Outer Layer: Windbreaker or light rain jacket—weather can change fast!
Pants vs. Shorts:
This is a matter of personal preference, but convertible pants (zip-off legs) give you flexibility as temps rise and fall throughout the day.
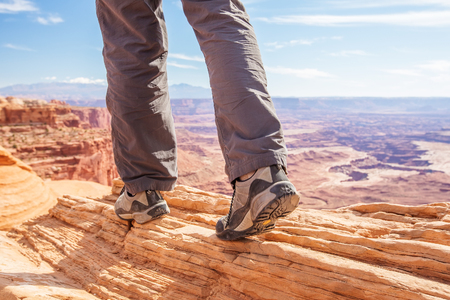
Socks & Footwear:
- Cushioned hiking socks (wool or synthetic) help prevent blisters.
- Well-broken-in hiking boots or trail runners with good grip are a must; avoid brand-new shoes.
Other Clothing Musts:
- Wide-brimmed hat or cap for sun protection.
- Sunglasses with UV protection.
Hydration Strategies: Don’t Run Dry!
The Arizona sun and dry air mean dehydration can sneak up fast. Plan to drink at least 1 liter of water every 2 hours—more if it’s hot or you’re sweating a lot.
| Hydration Item | Description/Tip |
|---|---|
| Hydration Bladder (2-3 liters) | Easier to sip while walking than bottles; keeps hands free. |
| Water Bottles (backup) | Bring an extra bottle as a backup or for electrolyte mixes. |
| Electrolyte Tablets/Powders | Add to water to replace lost salts from sweating. |
You’ll find water refill stations at Phantom Ranch and Indian Garden (seasonal; always check current status before your trip). Never skip a chance to refill!
Trail Food: Fuel Up Like a Pro
Your body will burn through calories quickly during this trek. Bring calorie-dense snacks that don’t melt easily in the heat. Aim for a mix of carbs, protein, and fat.
| Snack Idea | Why It Works Well on Trail |
|---|---|
| Trail Mix/Nuts/Dried Fruit | Packed with energy; easy to snack on the go. |
| Energy Bars/Granola Bars | No refrigeration needed; lots of flavors available. |
| Tortillas with Nut Butter or Jerky Wraps | Savory option that travels well in your pack. |
| Candy (M&Ms, Gummies) | Sugar boost for quick energy when you’re flagging. |
If you’re overnighting, lightweight dehydrated meals are a popular choice—just add hot water (bring a small stove if allowed by park regulations).
Packing Pro Tips:
- Avoid glass containers—they’re heavy and not allowed below the rim.
- Keeps snacks within easy reach so you don’t have to stop every time hunger strikes.
The right gear and smart packing make all the difference on your Rim-to-Rim adventure. With these tips, you’ll be prepared for whatever America’s greatest trek throws your way!
4. Trail Experience: What to Expect Along the Way
A Mile-by-Mile Breakdown of the Rim-to-Rim Trek
The Grand Canyon Rim-to-Rim hike is one of America’s most iconic adventures, taking you from either the North Rim or South Rim and traversing around 24 miles through breathtaking scenery, dramatic elevation changes, and diverse weather conditions. Here’s what you can expect along this epic journey:
Mile-by-Mile Highlights and Key Info
| Mile Marker | Landscape & Must-See Sites | Difficulty Level | Typical Weather Conditions |
|---|---|---|---|
| 0–2 (Rim Start) | Pine forests (North) or desert scrub (South), stunning canyon views at sunrise | Easy to Moderate (steep descent) | Cooler temps, especially early morning; can be windy |
| 3–7 | Switchbacks, layered rock formations, Coconino Overlook, Redwall Bridge (North Kaibab) | Moderate; watch your footing on descents | Warming up; shade in early miles but gets sunnier |
| 8–14 (Inner Canyon) | The Box, Phantom Ranch, Bright Angel Creek; lush riparian zone near the river | Challenging; exposed sections with little shade | Hotter temperatures, especially midday; bring plenty of water! |
| 15–20 (Ascent Begins) | Bright Angel Trail or South Kaibab Trail junctions, Indian Garden oasis (if South Rim finish) | Difficult; steady uphill climb with switchbacks | Variable—can still be hot at lower elevations but cools as you climb |
| 21–24 (Rim Finish) | Canyon vistas open up again; final push to rim with rewarding panoramic views | Tough—last few miles are a grind! | Cooler temps, possible wind or afternoon storms in summer months |
Managing Elevation Changes Like a Pro
- Pace Yourself: Descending may feel easy on your knees at first but can be tough over time. Don’t rush it.
- Rest Smart: Take breaks in shaded areas when possible—especially before big climbs like out of the canyon to either rim.
- Stay Hydrated: Water sources are limited, so plan refills at known locations like Phantom Ranch and Indian Garden.
- Ace the Ascent: The final climb will test your legs and lungs. Use trekking poles if you have them and take small, steady steps.
- Acclimate If Possible: Spend a night at the rim before starting if you’re not used to higher elevations.
Don’t-Miss Spots Along the Route
- Coconino Overlook: A quick detour for sweeping North Rim views early in your hike.
- The Box: This narrow section of the inner canyon traps heat but features amazing geology.
- Phantom Ranch: The only place to grab lemonade or mail a postcard from deep inside the canyon!
- Bright Angel Creek: Cool off your feet in this refreshing stream before heading up.
- Indian Garden: Lush greenery and shade make it a favorite rest stop for hikers.
- The Final Switchbacks: Both rims offer heart-pumping climbs—with mind-blowing views as your reward.
The Grand Canyon Rim-to-Rim is more than just a hike—it’s an adventure that challenges you physically and rewards you with some of the best scenery in America. With these tips and mile-by-mile insights, you’ll know exactly what to expect each step of the way!
5. Safety, Leave No Trace, and Cultural Respect
Important Safety Tips for Rim-to-Rim Hikers
The Grand Canyon’s Rim-to-Rim trek is breathtaking but demanding. Preparation is key to a safe adventure. Here are some essential tips:
| Safety Tip | Why It Matters |
|---|---|
| Start Early | Beat the midday heat and avoid dangerous temperatures. |
| Stay Hydrated | Dehydration is common—carry plenty of water and know where to refill. |
| Pace Yourself | Take breaks, listen to your body, and don’t rush. |
| Weather Awareness | Check forecasts; sudden storms or extreme heat can be life-threatening. |
| Emergency Plan | Know basic first aid and carry a map, whistle, and communication device. |
Backcountry Etiquette: Leave No Trace Principles
The Grand Canyon is one of America’s most cherished natural wonders. To help keep it pristine for generations, follow these Leave No Trace guidelines:
- Pack it in, pack it out: Take all trash—including food scraps—back with you.
- Stay on marked trails: Avoid creating new paths that cause erosion.
- Avoid picking plants or disturbing wildlife: Observe animals from a distance and leave flowers and rocks where you find them.
- Bury human waste: Use restrooms when available; otherwise, dig a 6-8 inch hole at least 200 feet from water sources and trails.
- Keep noise down: Let everyone enjoy the canyon’s natural sounds.
Respecting Native American Lands and Heritage
The Grand Canyon has deep spiritual significance for several Native American tribes, including the Havasupai, Hualapai, Hopi, Navajo, and others. Please respect their connection to this land by following these guidelines:
- Honor sacred spaces: Some areas may be off-limits; obey posted signs and respect closures.
- No collecting artifacts: Do not take pottery shards or other relics as souvenirs—they are protected by law.
- Acknowledge the land’s history: Learn about the tribes whose ancestors lived here and recognize their ongoing stewardship.
Preserving the Canyon for Future Generations
Your actions make a difference! By hiking responsibly, practicing Leave No Trace ethics, and respecting cultural sites, you help protect the Grand Canyon so that future adventurers can experience its wonder just as you have.